Christmas is now over and I have successfully defeated the dreaded man flu so it's all systems go!
Back in the workshop today to prepare ready for joining the wings together, either later tonight or tomorrow.
Updates to follow.
F3B.
Wednesday, 30 December 2009
Sunday, 13 December 2009
More Tailplane Pictures
Just a few more pictures of the tailplane as requested, there is still a little tidying up to do at the tips and edges but is good so far.
This is a great result and a 10% weight saving on the last one.


This is a great result and a 10% weight saving on the last one.


Saturday, 12 December 2009
Good Tailplane!!
A good result and probably the best tailplane yet, the weight is the lightest so far without any detriment to the strength, the major weight saving has been both the paint and epoxy.
The yellow paint is very opaque so it will be interesting to see the wings when they are joined next week.
I should receive delivery of the new disser tissue next Wednesday so a test tailplane will be made over the Christmas break before the next whole model is laid up.
Any comments welcome please?
Harry.


Foam core joiner
Just taken another joiner out of the mould. Much lighther than the one which still has the silicone still stuck in it. This one has roachel core and weighs 70g.

- Posted using BlogPress from my iPhone

- Posted using BlogPress from my iPhone
Friday, 11 December 2009
One In The Oven!
I managed to join the tailplane this evening, thanks for the nuts Mikey!
As you can see from the photos below the dry spars weigh just 10g, these were wet out and then dabbed with blue roll to take off all the excess resin. A small bead of epoxy/cotton flock/micro balloon mix was piped around the edges.
Should be ready to open the moulds tomorrow, update to follow.... right now I'm going out to collect a Chinese banquet and bottle of the good stuff with the lovely Mrs H.
Take care for now.


Tuesday, 8 December 2009
New joiner and fus layup results
Good news all parts are keepers. Slight problem getting silicone cores out of joiner, they broke off about 10mm in from the end so they will be staying in this one, this is a shame because the moulding is the best joiner I have made yet.


The fus has come out well although still some cosmetic issues around the wing seat. New lay up idea to increase hoop strength has worked really well, not too easy to see on the photo but you can just make out the band of additional twill weave cloth. In the flesh I am please to say it looks "well Trick"
Harry all I need now is a set of wings and a tailplane.

Hope all out there are enjoying the read, feed back it welcome and if anyone can give me any pointers on how to make hollow joiner I would be great full.
Monday, 7 December 2009
iPhone test
The oven is on and coming up to temp. Bladder pressure is good and will be increase to 100psi when resin starts to gel at 120 C and more importantly I have learnt how to attach photos to blogs from my iPhone


Sunday, 6 December 2009
Another weekend another fus
Just finished putting a fus, joiner box, ballast tube, nose cone and joiner in the oven at the High Peak Zenith factory. Tried something new on the joiner, use two silicone strips as the internal cores instead of the usual foam, I hope to remove these after curing to leave hollows. Also tried a slightly different layup of the fus around the wing seat and added some more hoop strength go the fus behind the wing, if nothing else it will certainly look different. Hope to turn the oven on tomorrow night so I should have parts to look at on Tuesday. Sorry no photos didn't get around to that today.
Pre Joining Work
Pre joining work is completed on the tailplane, they would have gone together today but frustratingly I have ran out of M3 captive nuts.......AAAHHHHH!
Not all bad news, this small set back has given me the head start on the pre joining work of the wings, all the shear webs are ready and lined up with the new joiner boxes. My new servos arrived Saturday morning courtesy of Phoenix models, I only ordered them at 4pm on Friday, fantastic service and at only £32.50 each this is a saving of about £5 against other suppliers, they are also getting a stock of Schulze receivers so this will be a one stop shop for me!
The servos are being moulded into the wing to increase the aerodynamic efficiency of the bottom wing surface as there will be no taped hatch. This will also decrease the amount of finishing work when the model is de-mouded, good news! We will eventually go the RDS route but for now we just want to get some models together for the 2010 season.
Anyway......I will order the M3 captive nuts tomorrow and will update soon.
Take take for now, Harry.


Monday, 30 November 2009
Weekend @ The Zenith Factory 3
Thumbs up baby!................a great result!
Firstly the new vac bags and pump were amazing and all worked perfectly without fault, the oven was also reliable as ever.
Many thanks to the lovely Mrs Harrison who helped out this evening getting all the moulds out of the oven and bags.
This should be a light one! After looking at the resin scores over the period of the weekend and the two build stages, they look something like this...
Resin/Hardener weighed out = 786g
Resin/Hardener left over from mixes = 194g
Resin/Hardener absorbed in rollers = 177g
Therefore total weight of resin/Hardener used in model = 415g
I will be ordering servos this week ready to mould into the wing when joining together, hopefully the tailplane's will be joined this week and the wings the following week, then it's ready for the next one!


Weekend @ The Zenith Factory 2
Tonight the moulds came out of the oven and bags after the second stage on Sunday. The UHM unidirectional carbon spars laid in, 93g carbon reinforcement and the inside layer of 25g glass cloth. A sheet of peel ply was placed on top of the moulds to soak any excess resin and prepare the surfaces ready for joining together, as when you peel it off (very carefully) when it comes out of the bags it leaves a rough wax free surface to ensure a good bond when joining together.
Also my new fus showing off the colour of my new model.


Also my new fus showing off the colour of my new model.


Weekend @ The Zenith Factory 1
'Big up you all'...............The Chalster looking decidedly pleased as all the bags are sealed by the new vac pump and bags, now ready for the oven.
Also below after the first stage, painted with one outer layer of 25g glass cloth followed by a second layer of 93g carbon cloth at 45 degrees and then the balsa skins.
The bottom picture gives you an indication of how much or little carbon goes into the spars, this UHM unidirectional carbon is 3m by 0.244m and this is all used up!


Saturday, 28 November 2009
Progress update


Neil & Mike Just finished for the day in the Northampton Zenith factory. First stage of new wing and tailplane complete, outer skins 25g glass 90g carbon and 1.5mm balsa core now in the vac bag and heating up in the oven. Started at 8:30 finished at 18:00 with no break thanks to the support team (thanks katie) keeping us supplied with tea and bacon butties. Tomorrows jobs are to sand down balsa cores in situ and lay up spar caps and inner 25g glass.
Looking good so far for a light build fingers crossed.
Monday, 23 November 2009
Fus production

Well following a disapionting result from last weekends oven run. I have just opened up the moulds from the last bake and I am happy to say it is the best fus yet! Light strong, as always there is areas for improvement but this is a keeper. Looks like we are on for a sub 2.5kg build.
This my first post from the iPhone hope it works.
Sunday, 22 November 2009
Less Hassle Vacuum System
Welcome Back!
After 3 to 4 months of redesigning the workshop to maximise the floor space, building new tables and work benches the new Northant's 'Zenith Factory' is back open ready for business!
I have made a new vacuum pump from an old fridge freezer which is silent running so leaks in the bag can be identified easier, this was trialed this evening with fantastic results.
The moulds sit on the bench on top of a polythene sheet, the breather cloth is then draped over the moulds. Mastic sealant is then piped around the edges of the polythene sheet, this will act as the adhesive and seal for the top layer of vacuum bagging material from R&G.
The air inlet nipple is fixed to the centre of the top vacuum sheet, the whole part of the top bag is then rolled onto a long hollow tube. Starting at one end the top sheet is rolled off, this allows for the perfect alignment with the sealant and a great seal as the top sheet is less likely to 'double over'.
Once in place all that is needed is to press the two surfaces together at the seems, connect the vacuum pump and hey presto!


Tuesday, 17 November 2009


Monday, 10 August 2009
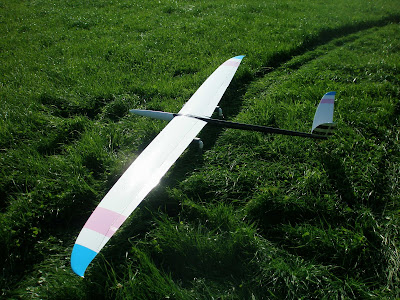
Test Fly
At last the day of reckoning, the inaugural test flight at The Wetlands UK, some 10 flights later and the model seems like it has a lot of potential.
Although this the first model is heavy it showed great promise in the light conditions, we are now back on track with this project after a delay. The next one will be in the moulds by the end of next week, so keep watching this space.
See you at the Nationals?


Although this the first model is heavy it showed great promise in the light conditions, we are now back on track with this project after a delay. The next one will be in the moulds by the end of next week, so keep watching this space.
See you at the Nationals?


Mike Challinor and The mighty Zenith

Me, 'Harry' with the Zenith.

Sunday, 19 April 2009


Subscribe to:
Comments (Atom)